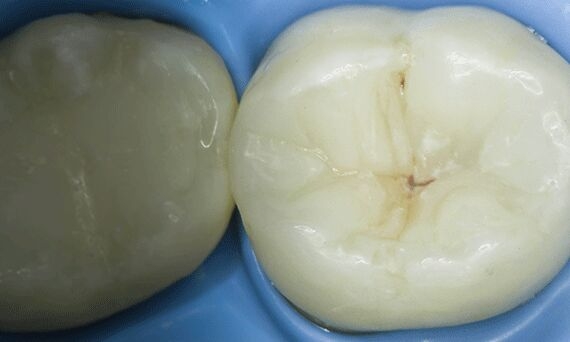
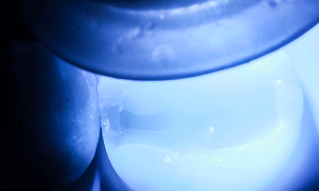
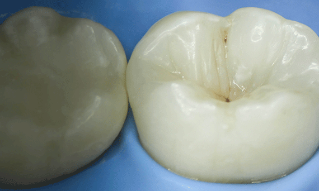
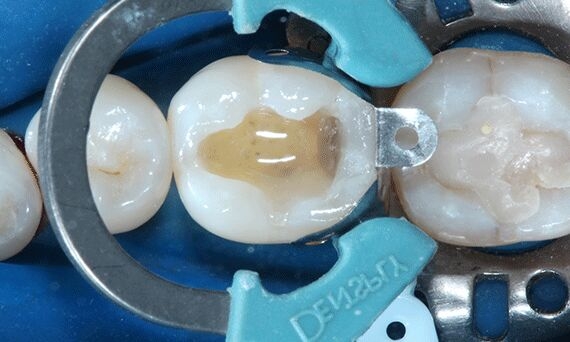
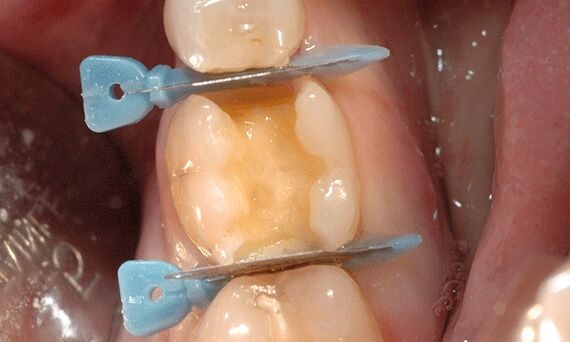
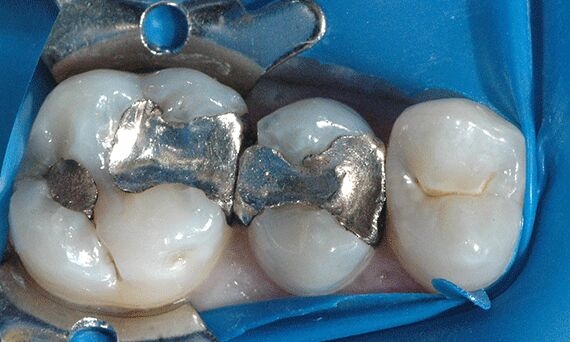
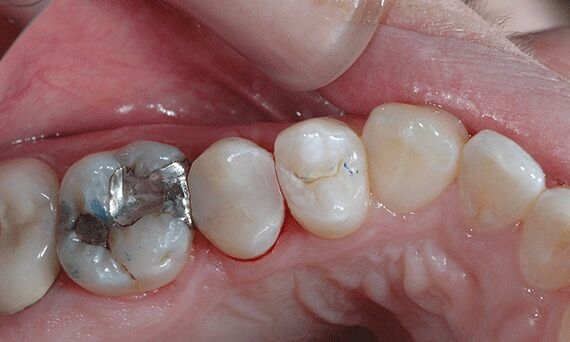
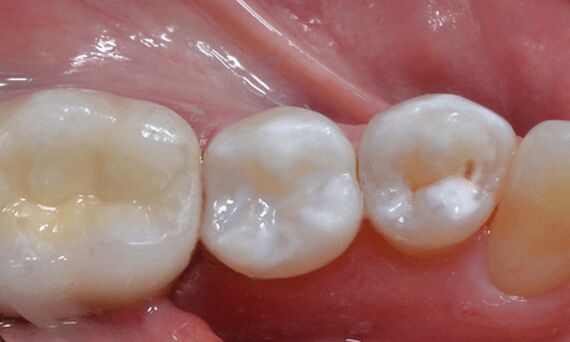
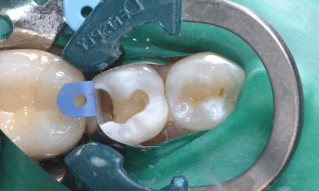
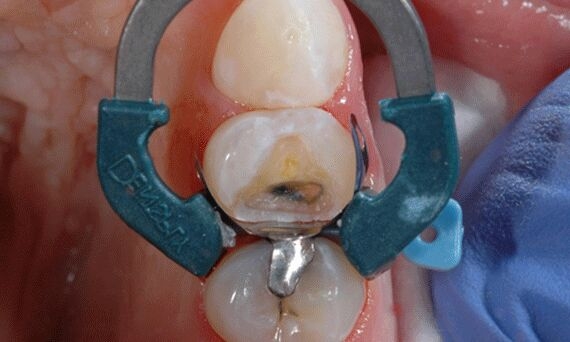
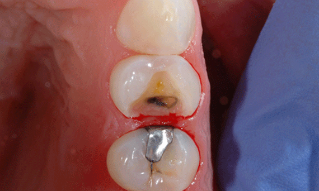
Replacement of failed composite restoration on tooth No. 37
-

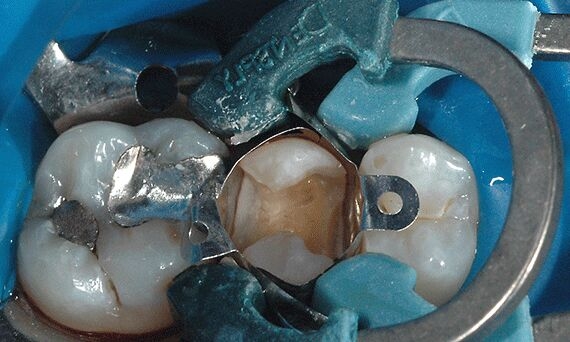
The previous restoration has been removed following the principles of minimally invasive dentistry.
-
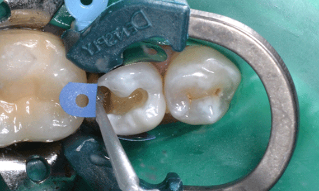
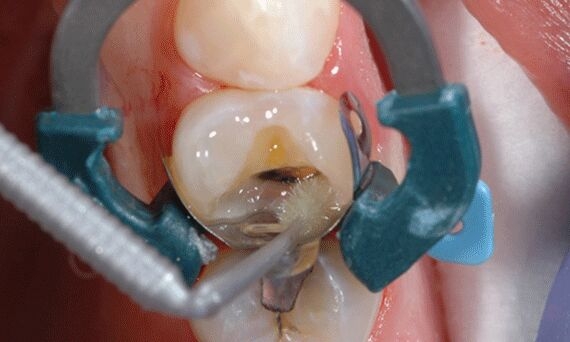
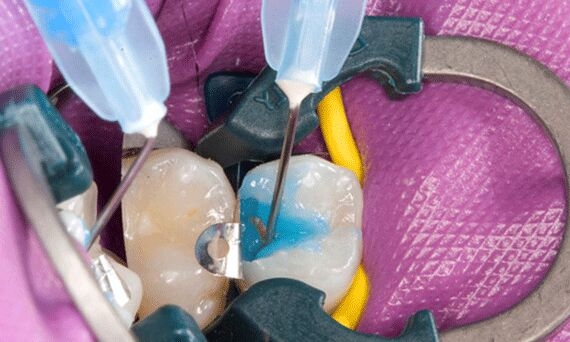
A universal adhesive is applied in self-etch mode according to the instructions for use.
-
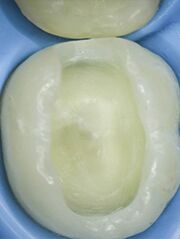
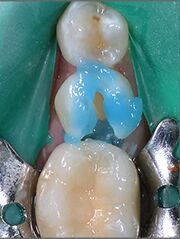
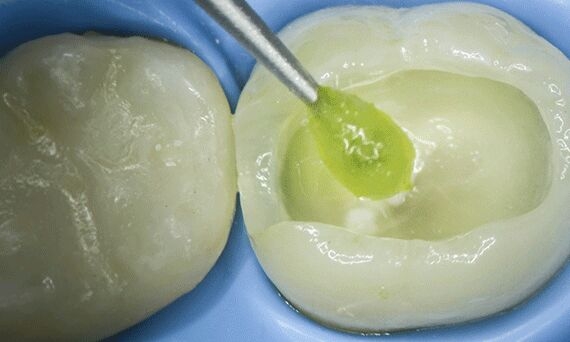
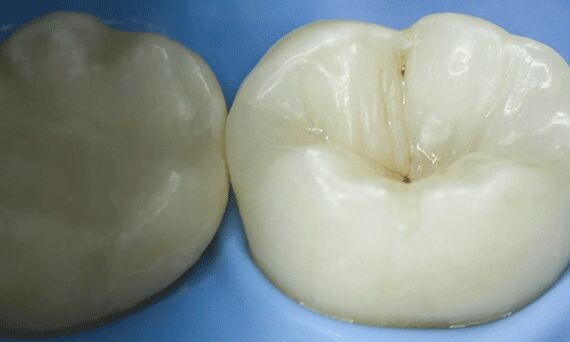
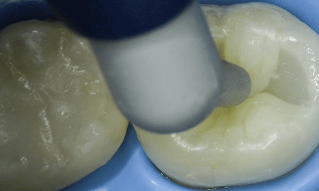
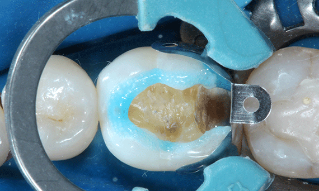
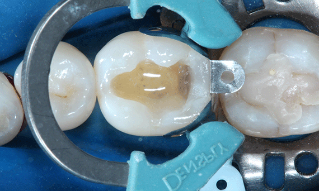
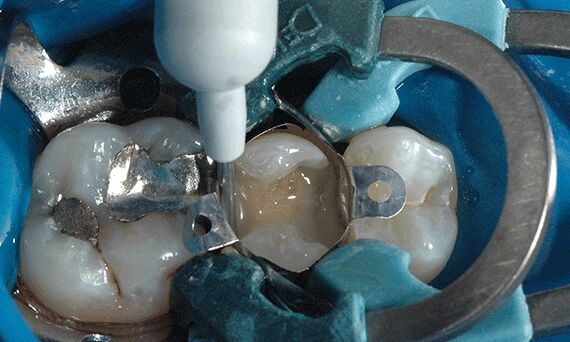
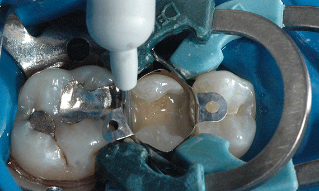
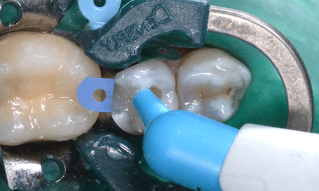
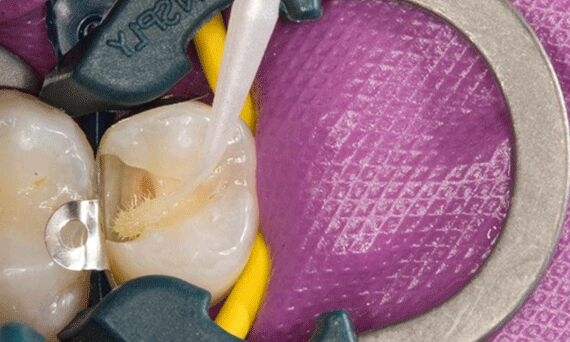
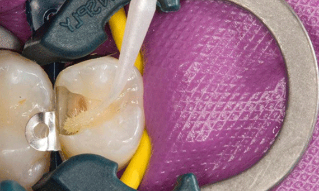
SDR flow+ material is applied as a base over all the dentinal areas up to the dentinal-enamel junction.
-
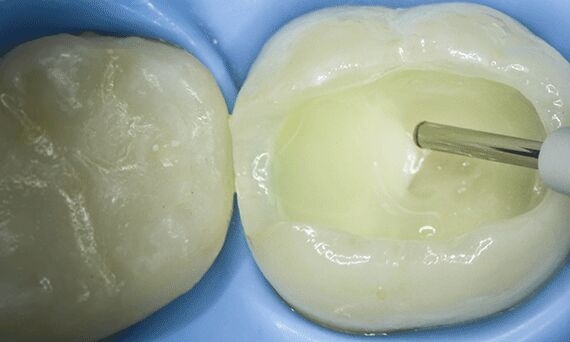
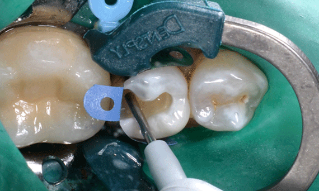
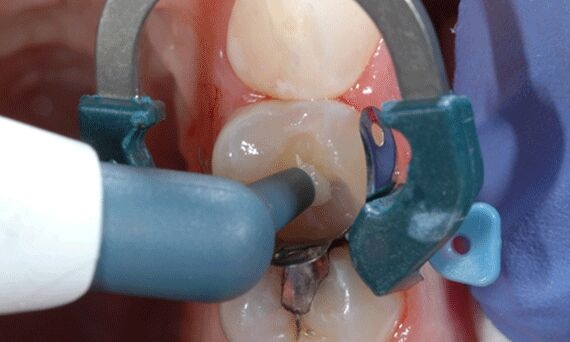
Cavity adaptation is excellent, and the low shrinkage of SDR® flow+ material permits filling at a 4mm maximum cure depth.
-
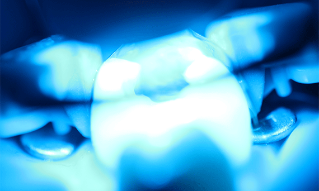
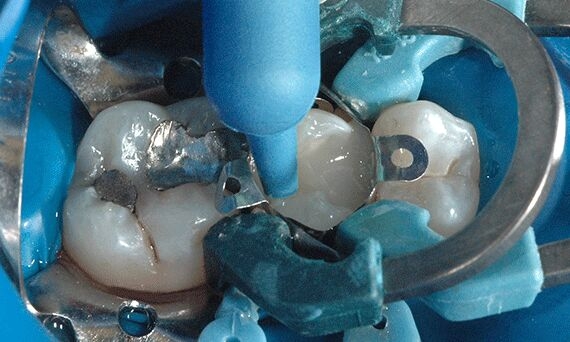
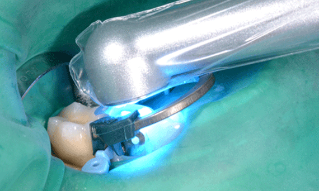
After easily achieving a good fit with no visible inclusions or imperfections, the SDR® flow+ material is light-cured.
-
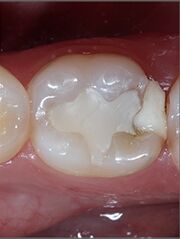
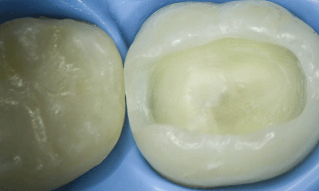
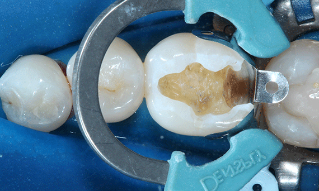
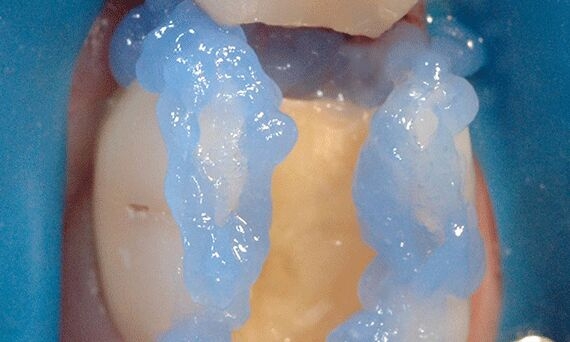
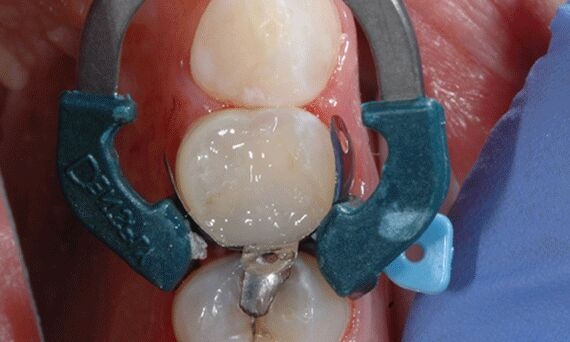
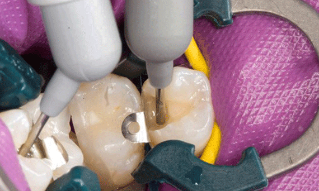
TPH Spectra® ST Universal composite material covers the entire VITA® range in only five CLOUD shades. Shade A2 is chosen for this restoration. In building up the occlusal layer, the material’s choice of viscosities and excellent cavity adaptation contribute to efficient placement and modeling.
-
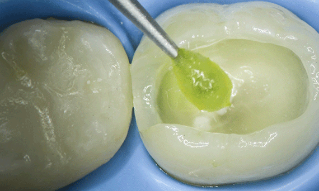
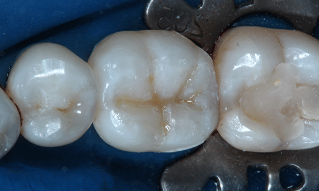
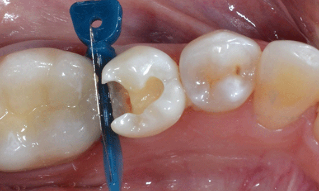
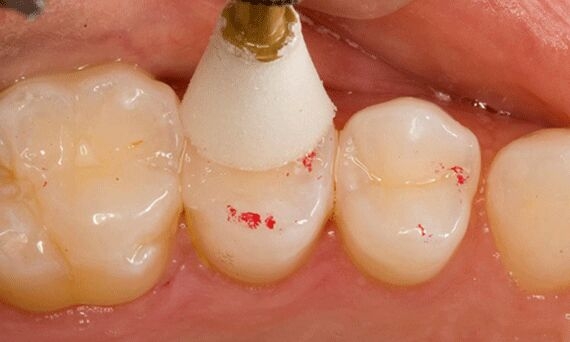
Note the accurate placement and optimal formation of the buccal and lingual embrasures, with no excess material and no gaps. Each cusp is individually restored with oblique increments and provisionally tack-cured for three seconds. The restoration is then cured for 20 seconds at a 2 mm depth of cure.
-
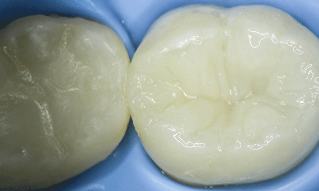
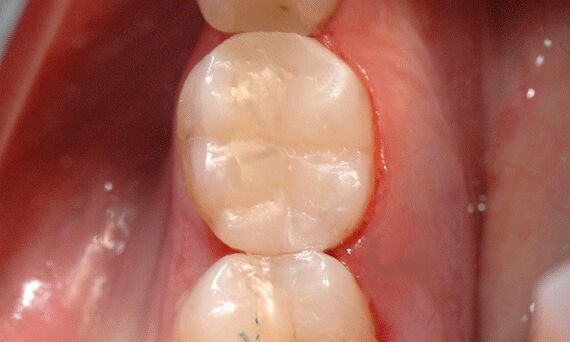
TPH Spectra® ST Universal composite incorporates SphereTEC™ filler technology, providing an enhanced chameleon effect that simplifies shade matching. The restoration is virtually indistinguishable from the natural tooth.
-
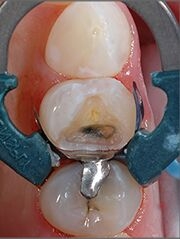
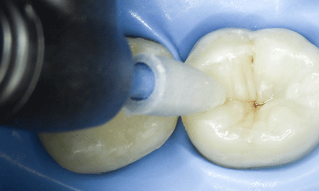
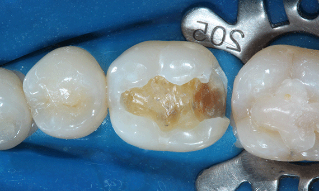
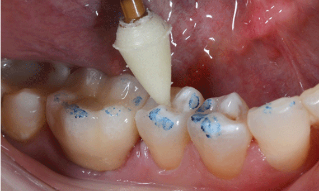
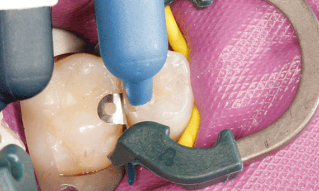
Tint material is applied to create a detailed esthetic representing the central fossae, primary and secondary grooves, and secondary ridges. This step has little value for the patient, but is performed here for teaching purposes.
-
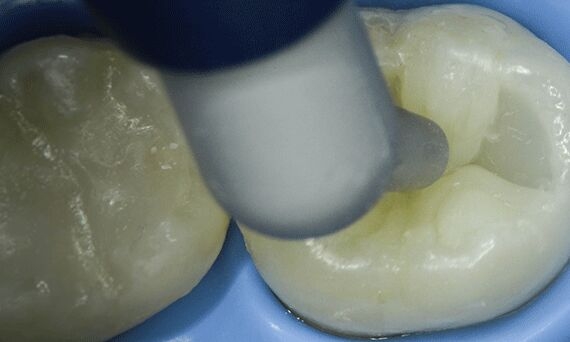
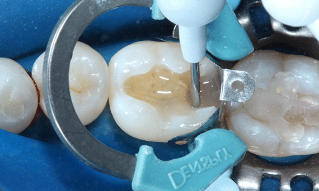
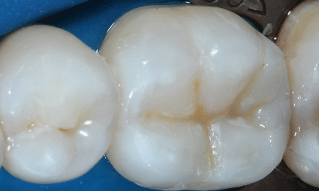
SphereTEC™ filler technology enables faster finishing and polishes to a natural luster. Dentsply Sirona's Enhance® mini Finishing System is used, accomplishing the entire process of excess removal, contouring and finishing simply by varying the pressure of the selected points, cups and discs.
-
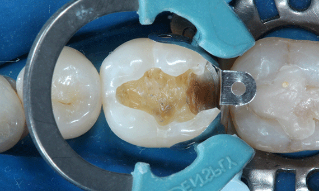
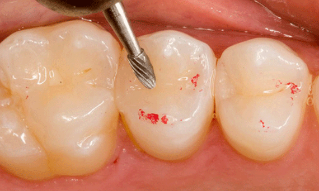
Minor occlusal adjustment using a fine-grit finishing diamond and the Enhance® mini Finishing System on the distal-buccal area results in excellent marginal integration.
-
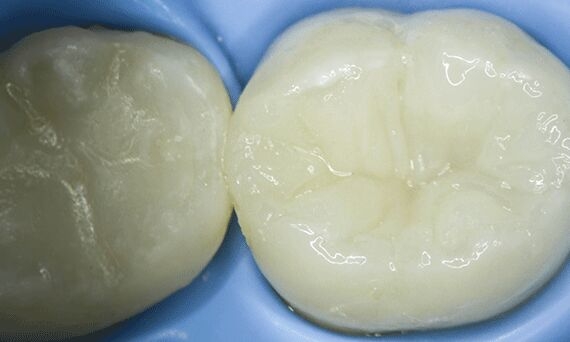
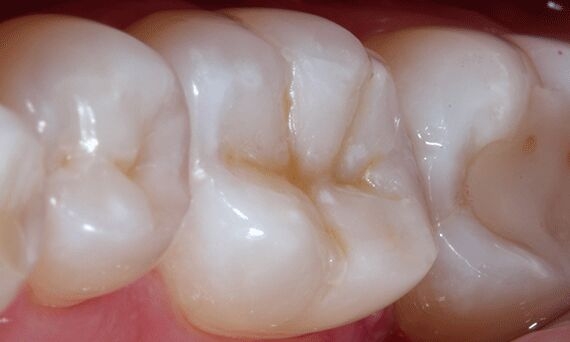
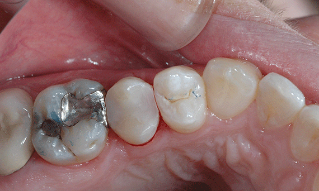
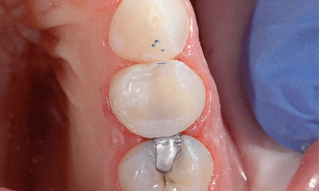
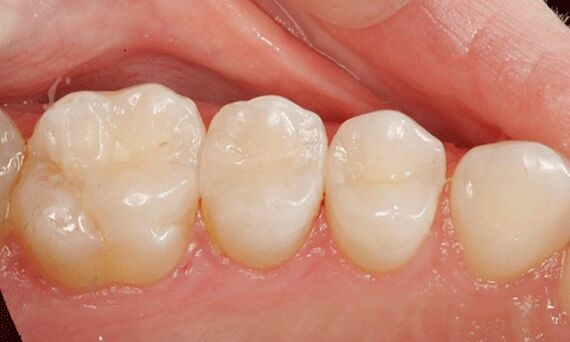
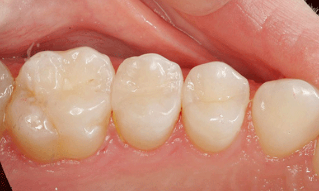
Dentsply Sirona's Enhance® PoGo® Polishing System is used to perform final polishing, and the restoration is complete. The cusp ridges and buccal surfaces correspond to the natural anatomy and are occlusally adjusted, contributing to the long-term durability of the restoration.


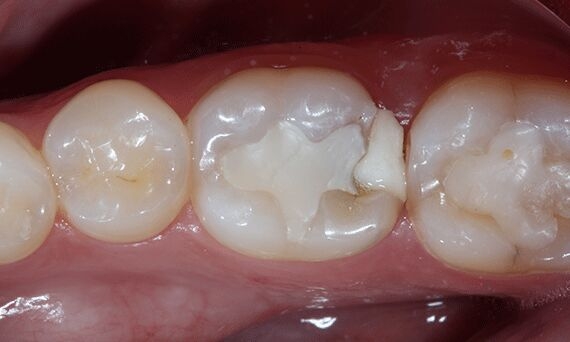
Class II composite OD restoration on tooth No. 19
-
Pre-operative appearance of Tooth no. 19 with a fractured Class II DO composite restoration.
-
After placement of rubber dam isolation.
-
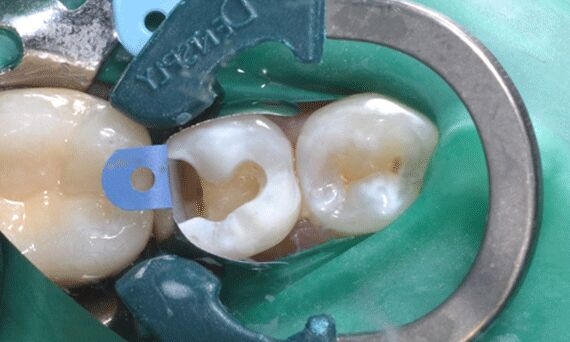
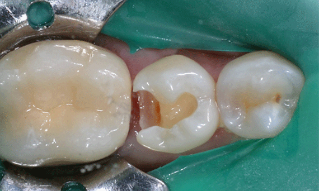
The old composite restoration and caries were removed. Note that the buccal-distal cusp was also compromised.
-
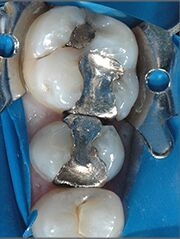
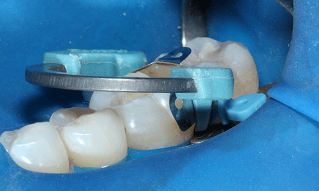
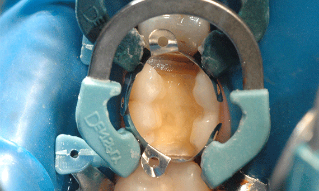
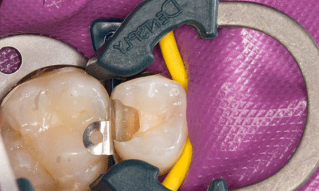
The Palodent® Plus sectional matrix system was placed using the Ni-Ti ring (size Universal) and the 6.5 mm matrix to prevent gaps in gingival-axial corner.
-
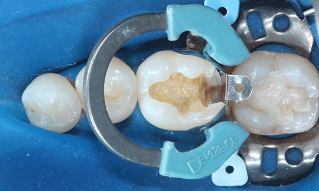
Buccal view of the matrix system in position. Note perfect adaptation of the matrix.
-
The hollow underside of the wedge allows placement of a second wedge from the opposite side for a tight gingival margin. In this case, large and medium sizes were used.
-
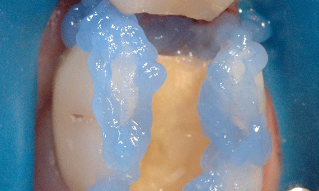
Enamel margins were selectively etched with phosphoric acid for 15 seconds.
-
Note the chalky white appearance after rinsing off the phosphoric acid and air-drying.
-
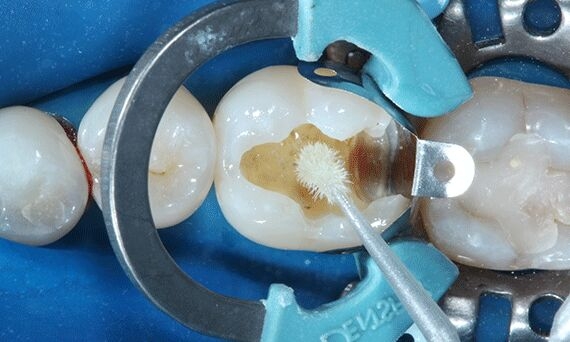
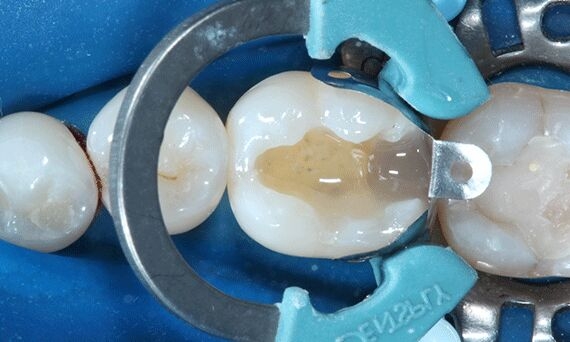
Prime&Bond Elect® Universal adhesive system was applied in the selective etching mode.
-
After solvent evaporation, light curing was performed with SmartLite® Focus® curing light for 10 seconds.
-
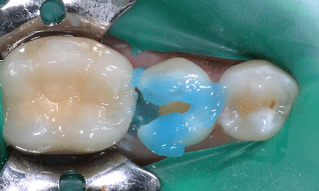
SureFil® SDR® flow composite (shade A1), which is a self-leveling bulk-fill, low polymerization stress composite, was inserted. Application was initiated in the distal proximal box.
-
In one single increment of up to 4 mm, SureFil® SDR® flow was inserted to replace dentin structure. Light-activation was performed for 20 seconds with SmartLite® Focus® curing light.
-
Afterwards, TPH Spectra® universal composite HV (shade A1), was used for the occlusal surface. First, a composite increment was inserted for reconstruction of distal proximal ridge.
-
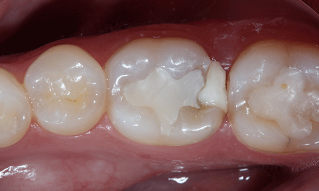
Appearance after placement of composite and characterization stains.
-
Finishing was completed using Enhance® Finishing System, followed by PoGo® Polishing System to improve the final luster.
-
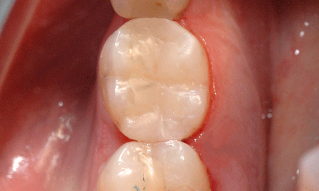
Immediate final result after minor occlusal adjustment.


Mesio-occlusal decay under an existing No. 30 MOD-composite
-
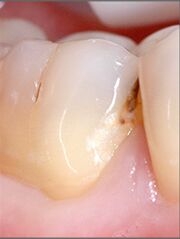
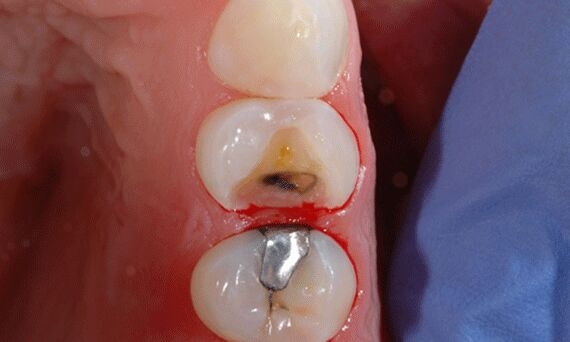
Pre-operative view of Tooth No. 30. Note the recurrent caries along the mesio-facial margin of the proximal box.
-
After administering one carpule of 4% Articadent® with 1:200,000 epinephrine, two Palodent® Plus WedgeGuards are placed and the preparation is completed. The WedgeGuards allow for more efficient preparation while preventing iatrogenic damage to adjacent teeth. In this case, a previous practitioner had already damaged the distal of Tooth No. 29, care was taken not to further flatten the distal contact.
-
Using a sling technique the working field is isolated using a rubber dam. 34% phosphoric acid is placed on the enamel margins for up to 30-seconds followed by water rinsing.
-
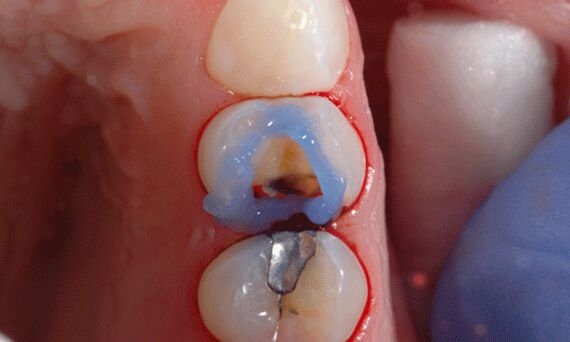
The preparation is isolated with the Palodent® Plus Sectional Matrix System. Note that even though both rings are oriented mesially, there is sufficient access to place restorative material into both mesial and distal areas of the preparation.
-
The final restoration on Tooth No. 30-MOD, occlusal view. The materials used were: Prime&Bond Elect® Universal Dental Adhesive, SureFil® SDR® flow Posterior Bulk Fill Flowable Base, TPH Spectra® Universal Composite Restorative HV A2, and the Enhance® Finishing System.
-
The final restoration on Tooth No. 30-MOD, view from the mesial. Note the excellent color matching, smoothness of material, and overall contour.


Fractured MOD-amalgam on tooth No. 13
-
Pre-operative appearance of Tooth No. 13 MOD showing a fracture of the amalgam restoration at the disto-buccal corner of the restoration. The patient has been anesthetized with one carpule of 2% Xylocaine with 1:100,00o epinephrine, and a rubber dam has been placed using a sling technique.
-
The existing amalgam has been removed and the preparation has been refined to remove any caries or stain. The Palodent® Plus Sectional Matrix System is in-place demonstrating one of the possible ways the rings can be positioned to allow for restoration of a MOD posterior composite.
-
After etching of the enamel margins for up to 30-seconds, scrubbing in Prime&Bond Elect® Universal Dental Adhesive followed by a 10-second light cure, the first restorative layer is placed using SureFil® SDR® flow Posterior Bulk Fill Flowable Base up to 4mm. Care is taken to allow room for a 2mm layer of hybrid composite to be placed over the SureFil® SDR® flow.
-
After light curing the SureFil® SDR® flow for 20-seconds, the final restorative layer is placed using TPH Spectra® Universal Composite Restorative shade A2. After sculpting and manipulating the TPH Spectra®, it is light cured for 20-seconds.
-
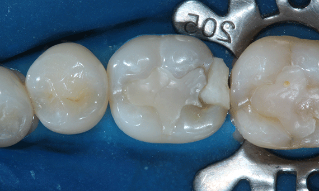
The final composite restoration on Tooth No. 13. The rubber dam has been removed; the restoration has been smoothed with fluted composite burs, and finished with the Enhance® Finishing System. Note the broad contact between Tooth No. 13 and the adjacent teeth.


Disto-occusal composite on tooth No. 29
-
Pre-operative appearance of tooth No. 29 showing disto-occlusal caries.
-
Before beginning preparation of tooth No. 29, a Palodent® Plus Wedge Guard is placed between teeth No. 29 and 30 to prevent iatrogenic damage to the mesial of tooth No. 30.
-
Preparation of tooth No. 29 complete. Rubber dam isolation in-place.
-
Using Caulk® 34% Tooth Conditioner, the enamel is etched for approximately 15-seconds to avoid inadvertent over-etching of dentin.
-
Palodent® Plus Sectional Matrix System in place. A Palodent® Plus EZ-Coat matrix is being used which features super curved anatomical form and a non-stick coating for easier removal.
-
Applying Prime&Bond Elect®. The material is scrubbed into the preparation, air dried for 5-seconds, and light cured for 20-seconds.
-
The first restorative layer is placed using SureFil® SDR® flow bulk fill flowable. SureFil® SDR® flow bulk fill flowable can be placed in up to 4mm increments and should be light cured for 20 seconds.
-
Light curing of the SureFil® SDR® flow bulk fill flowable using SmartLite® Focus® curing light.
-
The final restorative layer being placed using TPH Spectra® Universal Composite Low-Viscosity (LV). TPH Spectra® LV offers clinicians a creamy-handling composite that can be easily worked into a preparation and spread against the margins of the tooth.
-
The restoration of tooth No. 29 shown after the final occlusal layer of composite is light cured.
-
Enhance® Finishers can be used for contouring and finishing of composite restorations during the occlusal adjustment.
-
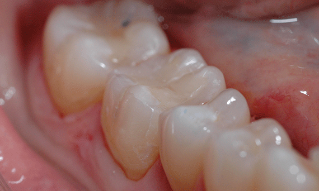
The final restoration of tooth No. 29 shows excellent contours, contacts, and color blending.


Restoring a difficult interproximal contact on tooth No. 5 - DO
-
The completed preparation on tooth No. 5. Note the large interproximal space between tooth No. 4 and 5 potentially making a direct composite restoration difficult.
-
Using Caulk® 34% Tooth Conditioner Gel, the enamel margins can easily be etched to maximize the bond strengths.
-
Prime&Bond Elect® universal adhesive is scrubbed into the preparation on tooth no. 5. It is then air dried for 5-seconds and light cured for air 20-seconds.
-
After placing Surefil® SDR® flow bulk fill flowable into the proximal box and light curing for 20-seconds, the final restorative layer is placed using TPH Spectra® Universal Composite HV (high-viscosity). Each 2mm increment of TPH Spectra® should be light cured for 20-seconds.
-
Tooth No. 5 after the final occlusal layer of TPH Spectra® has been placed and cured.
-
Final restoration after removal of the Palodent® Plus Sectional Matrix System. Finishing has been completed using Enhance® Finishers.
-
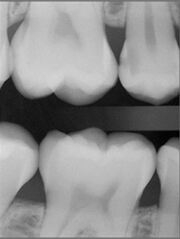
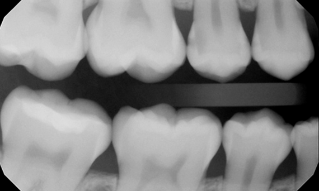
Final radiograph of tooth No. 5 illustrating excellent radiopacity of the Surefil® SDR® flow bulk fill flowable and TPH Spectra®. Also, good interproximal contour has been achieved as well as excellent contact between Teeth No. 4 and 5.


Class II composite resin on the disto-occusal of tooth No. 4
-
Pre-operative radiograph. Note the carious lesion on the distal of tooth No. 4.
-
The completed preparation on tooth No. 4 has been isolated using a rubber dam and the Palodent® Plus Sectional Matrix System.
-
Caulk® 34% Tooth Conditioner Gel is applied to the preparation of tooth No. 4. Even using the small blue syringe tip it is difficult to place phosphoric acid on enamel only. With Prime&Bond Elect® adhesive practitioners can select any etching mode; total-etch, self-etch, or selective-etch without negatively impacting bond strengths or increasing the likelihood of post-operative sensitivity.
-
Prime&Bond Elect® adhesive is scrubbed into the preparation on tooth No. 4 for 20-seconds, then air dried for 5-seconds to evaporate the solvent.
-
The first restorative layer is placed using SureFil® SDR® flow bulk fill flowable. SureFil® SDR® flow bulk fill flowable can be placed in up to 4mm increments followed by a 20-second light cure. Within a few seconds, dispensed SureFil® SDR® flow bulk fill flowable material will self-level, eliminating the need for further manipulation with hand instruments.
-
The final restorative layer (at least the occlusal 2mm of the restoration) is placed using TPH Spectra® Universal Composite. Shown is the high-viscosity (HV) formulation which provides a stiffer handling composite. TPH Spectra® should be light cured for 20-seconds after each increment is placed.
-
After light curing the final occlusal layer of composite, the Palodent® Plus Sectional Matrix and rubber dam are removed. Gross occlusal reduction and contouring is achieved via a fluted composite finishing bur.
-
Enhance® Finishing cups, discs, or points are used for final contouring and finishing.
-
The restoration on tooth No. 4-DO. Note the excellent color blending, contour, and interproximal contact.


Want to know more about our Restorative Products?
Submit your contact details and one of our restorative specialists will get in touch with you soon.